A ridiculously detailed and opinionated attempt to let Angular and Vue peacefully live together (if you wanna rock’n’roll)
Sometimes you have to say “stop!” and decide it’s time to migrate to a warmer and sunnier place.
Chances are that you are quietly writing code to grow up and fix your shiny-happy-die-hard-godzilla app in Angular 1.x, day by day (with a certain amount of satisfaction, why not?).
In the meantime, as Darwin would say (the man, not the OS), javascript species evolve over time. And, not so surprisingly, you wake up one day to discover that you and your creature are slowly fading to black (“I cannot stand this hell I feel…” you know).
Reasons can vary: Angular 1.x will no longer be supported soon; you can indeed write a better javascript today; your application can improve in performance and maintainability… you name it.
So no choices here, actually, winter’s coming: time to migrate.
Disclaimer
I will not share here the reasons why we choose Vue over alternative frameworks: that’s not the scope of this writing. I do not want to suggest that Angular is the nuclear winter, and Vue a fresh breeze in a mild Tuscany vineyard.
But things change. And things can change really fast today at the battlefront of fronted development (loudly playing ’70s Battlestar Galactica soundtrack here).
Furthermore, I do not claim to be an expert neither in Angular, nor in Vue (or in javascript, for all that it matters). In what follows I am just exposing what I found to be a possible solution to a specific problem I had.
Maybe it could be helpful to someone else, or maybe someone will address me to a better solution. So here we are.
The problem
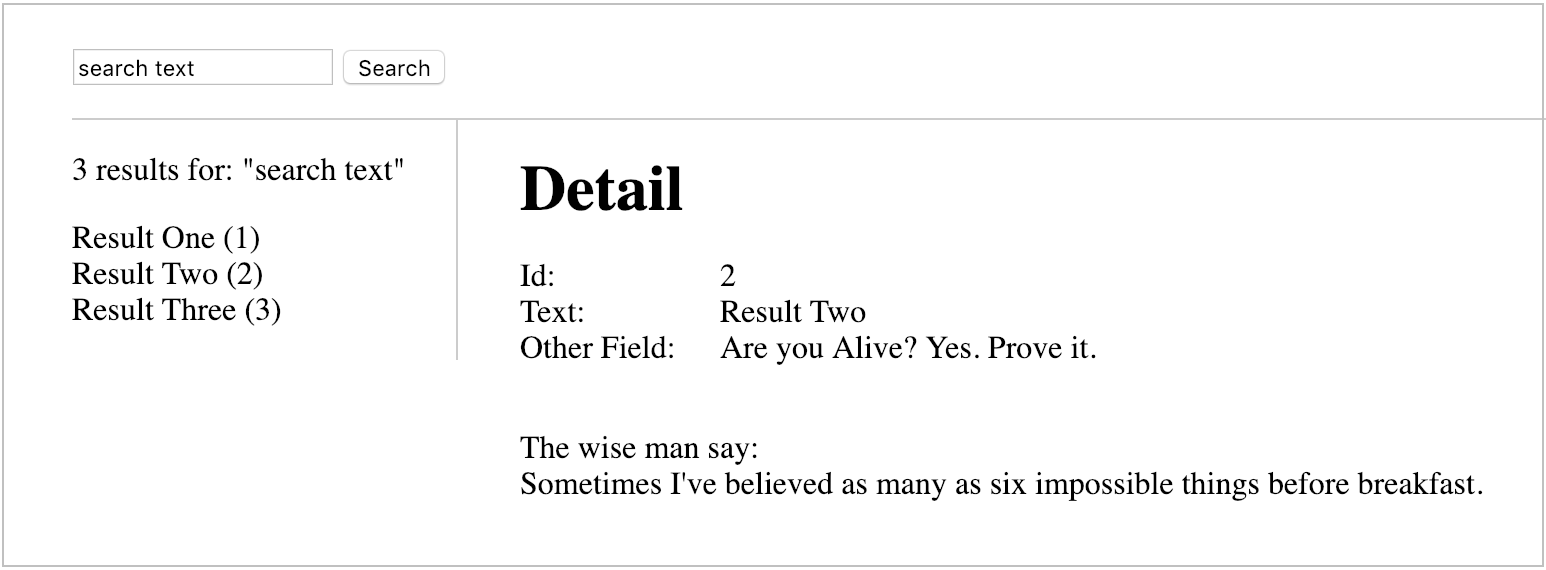
We’ve got a huge legacy single-page app, five or six years worth of coding in Angular 1.x, whose layout may be schematically represented as in this picture:
Which, if we break it down into its constituents, mainly results composed of five components:
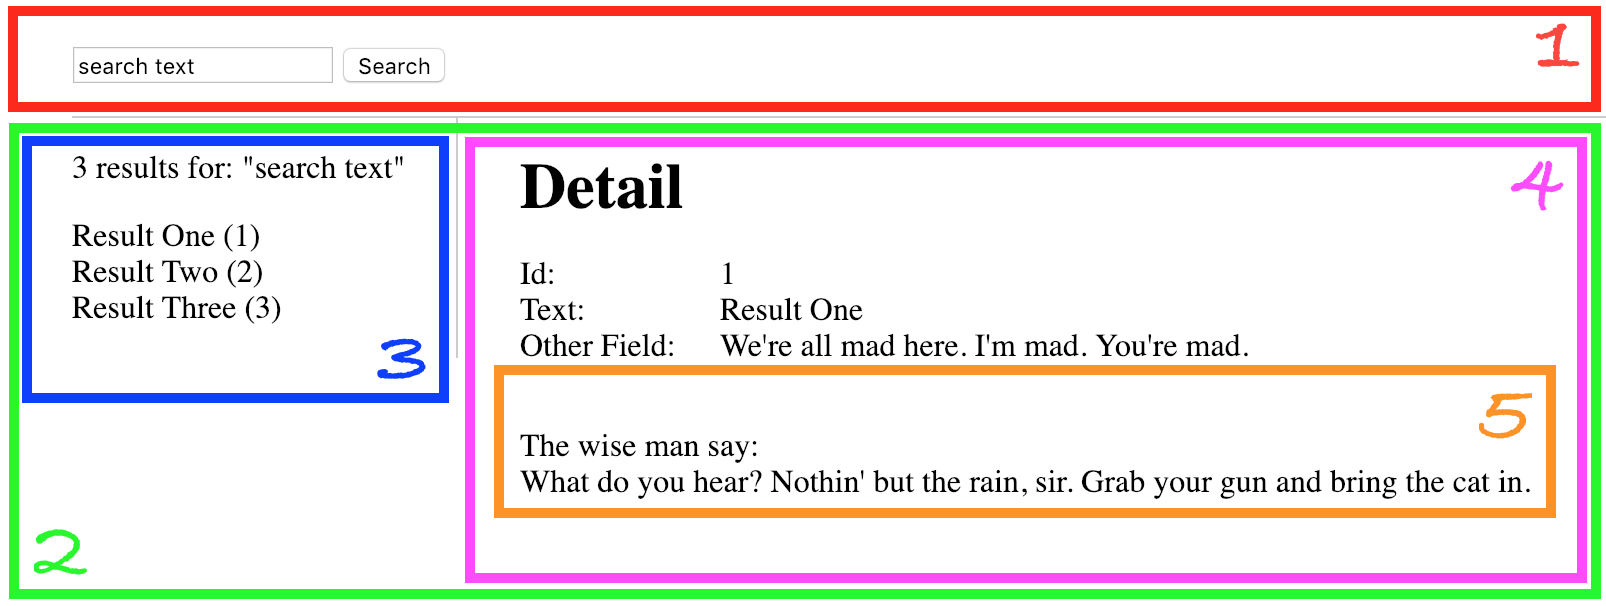
1. A header, which contains a form to query for something.
2. A wrapper for a master-detail view.
3. A sidebar, which displays search results.
4. A container to display the currently selected detail’s info.
5. A sub-component, inside the previous one, to display additional data.
At this point our applications is simply organized according to the following directory structure:
No webpack, transpilation or other module bundling helpers.
See the codebase in the tag-01-angular-app tag of the associated repository.
Ideally you will migrate everything to Vue, but you cannot stop implementing new features while rejuvenating. No chances to unplug the app today to plug it in a year from now completely renewed (it could be dangerous or really time consuming). You have to maintain the legacy code, allowing the beasts to communicate, deploy often to reiterate on changes done, and migrate it progressively, step by step, with a little patience, as the poet would say:
“Said, woman, take it slow
(Guns N’ Roses)
It’ll work itself out fine
All we need is just a little patience.”
In the end, for reasons I will not expose here (related to an old architecture and refactoring decisions), what we are going to do, at least as a firs step, could be summarized as:
- keep the Angular app alive;
- completely rewrite in Vue the component number 2 (the master-detail wrapper) together with its children, components 3 and 4; but…
- recycle Angular child component number 5 (which is too big, too complex to be refactored for the time being).
What I am stating is that from an app completely written in Angular 1.x we are moving to this hybrid solution:

I know what you are thinking. But it happens. And (if you are like me) here the fun begins!
Requirements
We can hence list the main guidelines which will direct the migration:
1. Support for Vue components inside an Angular app.
Aka: Vue components inside Angular components. This gives us the ability to replace Angular bricks with Vue bricks, avoiding our building to collapse.
2. Support for Angular components inside Vue components.
Aka: vue inside angular inside vue (doh!). Wait a minute: what? I know, it sounds really strange, but better to reign in Hell than serve in Heaven, right? Well, kind of. As we stated above, we still need to maintain something Angular inside the new Vue codebase. Simply no options here.
3. Vuex store, seamlessly shared between Angular and Vue.
We will progressively introduce Vuex as the one source of truth to manage application state.
4. vue-router.
We would like to introduce client side routing, to facilitate view switching.
5. A module bundler.
We will make use of ES6+ javascript and modules, a CSS preprocessor, and will bundle our transpiled code to include it in the existing application. Webpack at rescue here.
So what?
A lot to do, so many things to understand and to fit into each other.
“Me and my brother Vue here,
(Tenacious D)
We was hitchhikin’ down a long and lonesome road.
All of a sudden, there shined a shiny demon.”
ngVue enters here.
“ngVue is an Angular module that allows you to develop/use Vue components in AngularJS applications.”
(ngVue repo)
Cool: I am a really bad swimmer, but at least a bridge exists. I can write a Vue component and include it into the existing Angular application. That’s a good start.
Angular, Vue, ngVue (and Webpack). The Three Musketeers!
Enlightening the path
The Alien movie teaches us that the best way to generate a new creature is incubating it from the inside.
To avoid side effects, I would like to preserve things as they are, as much as possible. I would like to isolate the source code I am going to add, and transpile it in a form I can use into the existing.
So i create a nest for Vue in the form of a new folder, let’s call it vueApp:
Ideally the vueApp folder will contain everything related to the migration: Vue code, Vue-Angular temporary hybrid code, Webpack and package.json configurations, node_modules, and the final “production ready dist” byproduct.
Furthermore, I want to keep Vue and hybrid code separated, to be able to delete no more useful Angular code in the future. For a similar reason, I create a DEV folder also, which contains mockups or everything useful to webpack-dev-server only. Adding a bunch of styles assets we then finally come to a development ready directory structure, which, in the end, will be similar to the following:
Please note: here I will not initialize the Vue app through vue-cli. I am reusing a Webpack custom configuration which suites my needs. Nevertheless, everything should work the same way if you are using vue-cli.
See tag tag-02-app-directory-structure (with empty folders and files).
First things first: setting up Webpack and NPM dependencies
Let’s start by “emulating” an Angular app to re-create an environment to make quick development iterations before injecting the code into the real app. For sure, this is a contrived example which delineates the way I dealt with my problem: as stated above, in the original Angular app I have got no support from Webpack (or other module bundlers), and ideally I do not want to modify in any way the existing codebase.
By bootstrapping a dev environment with modern tools I can instead quickly write and test new Vue code and Angular-Vue interactions through webpack-dev-server. Please refer to tag-03-bootstrapping-dev-angular-app for a detailed view of the Webpack config files and NPM dependencies (I am using Webpack 4 here).
Webpack config
Before we start, a few points to note.
Let’s begin with webpack.config.js file.
Dev and “library” mode
We will initially build our components inside the DEV folder, taking advantage of our testing environment. During development hence, the main entry file will be DEV/dev.index.js, and the generated javascript will be injected into index.html page.
When will switch to the real production build, we will build the codebase as a javascript bundle to include in the existing Angular app, exactly as we would include a new library, and the main entry point will then be index.js.
The production build
Here we are in essence telling Webpack to generate three files in the final build:
- appVueLib_VendorsDependencies.js: a file to include all vendors dependencies (like vue, vuex, vue-router…).
- appVueLib_NgVueBridge.js: a bundle which contains the “hybrid” code required to temporary integrate Angular and Vue. Virtually, once the migration is complete, this code could be completely removed, and the generated file simply will exist no more. We will work on this folder later.
- appVueLib.js: the “real porting”, the new code completely written in Vue.
Those are the files we will include into the existing old Angular app.
Angular as a global object
The old app already depends on Angular, which is included as an old script tag.
Hence, to allow the new bundles to access things defined by other javascript on the page, avoid duplication in the build process, and duplication warnings at runtime, we take advantage of Webpack externals. The angular dependency is supposed to be already present in the consumer’s environment.
Again, we will make use of it later on.
package.json
In the package.json are listed all the NPM dependencies we will use now and later (like ngVue or vuex).
The only thing to note here I will use ES6 to write angular code, so I will take advantage of the babel-plugin-angularjs-annotate to solve dependency injection. In ES6 code you will find the /** @ngInject */ decorator. From you terminal, go to the vueApp folder and run install:
cd code/vueApp/npm install
A new beginning: setting up a dev app
All the pieces are now in place to begin the real work. Let’s start from the DEV folder.
Create an AngularAppWrapper to host our fake Angular app. At the end this will be the structure of the DEV folder:
We will use ES6 to write the angular component (ES6 syntax could also facilitate a porting from old angular codebase to a complete rewriting in Vue):
DEV/AngularAppWrapper/index.js
whose template is so simple as:
And let’s use it into our development Angular app:
DEV/dev.index.js
Now from you terminal launch
npm run dev
Nice! A simple Angular app on which experiment with our migration.
Again, refer to the tag-03-bootstrapping-dev-angular-app for everything done so far.
Enters ngVue
Let’s now create and use our first Vue-inside-Angular component. To do that we will ask for help to ngVue (refer to the official ngVue documentation for more info).
I will begin by defining a new Angular module to contain everything related to ngVue.
ngVueBridgeCode/ngVueComponentsModule.js
We are simply creating a new Angular module, using, as dependencies, ‘ngVue’ and ‘ngVue.plugins’ (we will use ngVue plugins later, with vuex, for instance). Basically, this will be the namespace to contain “angularized” Vue code.
Ok, time to create our first Vue component.
Let’s define a component for a simple app navigation. Note I am using the vueCode folder here, because I am writing a fresh component completely in Vue, to replace existing Angular code. Contrarily to DEV and ngVueBridgeCode folders, which will be eventually deleted, the vueCode one contains the real final migration.
vueCode/components/VueAppContainer.vue
Now, if you simply include this new Vue component inside the AngularAppContainer it will be ignored.
DEV/AngularAppContainer/index.html
You have to tell Angular to render this component through ngVue.
Let’s create a file to “transform” Vue components into Angular ones. With, ngVueDirectives.js we are telling Angular, through ngVue, that our Vue components exist. Again, ngVueDirectives.js is only a temporary bridge file, so we will put it inside ngVueBridgeCode folder.
ngVueBridgeCode/ngVueDirectives.js
We are using ngVue’s createVueComponent factory to translate a Vue component into an Angular directive.
As a first step, we inform the main angular module of the existence of our angularized-vue-components, so inside dev.index.js replace
angular.module('ngVueApp', []);
with
et voilà: your first Vue component inside Angular!
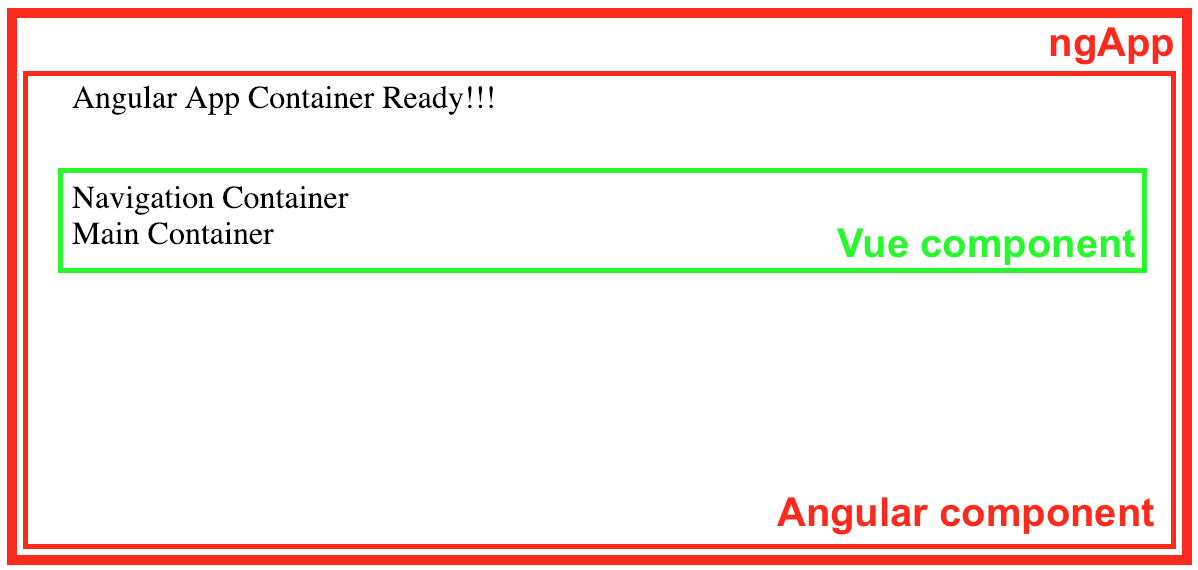
Basically, we have just fulfilled requirements #1 and #5: we can write new components in Vue, include them into the existing Angular application, and use modern development and bundling tools.
Back to the real: linking old and new applications
“Where we’re going, we don’t need roads.”
(Dr. Emmett Brown, Back to the Future)
But, to say it all, we have to leave our safe development environment, take off, and use the new component inside the real application.
Add to index.js the dependencies required:
vueApp/src/index.js
go to your terminal and run
npm run build
What you get is a vueApp/dist folder which contains the following files:
This is exactly the “lib” we were looking for to enhance our existing Angular application.
In the main index.html, include those files and use the new Angular directive:
code/index.html
And do not forget to inform Angular a new module for Vue components exists:
code/angularApp/angularApp.js
Et voilà, it simply works:
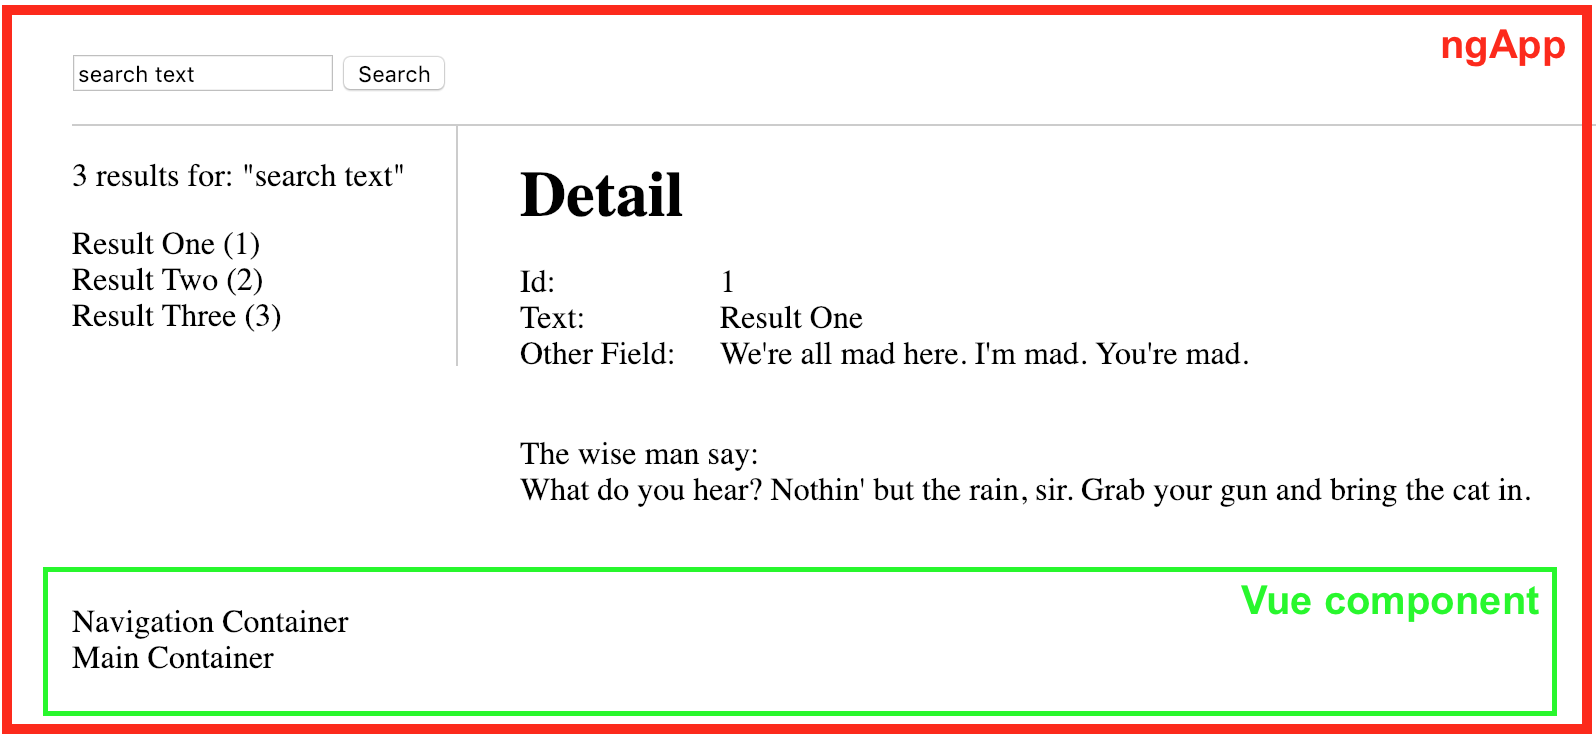
As a reference, see tag-04-vue-component-inside-real-app.
If you are curious, yes, you can also pass props:
code/index.html
code/vueApp/src/vueCode/components/VueAppContainer.vue
“You still don’t understand what you’re dealing with, do you? Perfect organism. Its structural perfection is matched only by its hostility.”
(Ash, Alien)
A simple client routing: Vue global plugins
One of the reasons we started this journey was to replace the master-detail component in the Angular application. So far we have seen how easy is to use a Vue component inside Angular. Let’s now introduce a little bit of client routing through the vue-router module. This will give us the opportunity to use the $ngVue factory from ngVue.plugins, and analyze how to define root Vue instance properties.
Let’s start by defining a simple router file.
vueCode/router.js
vueCode/components/Detail/index.vue is a simple replacement for the existing detail view.
Then, in the container, empty the main tag and append a router-view component:
vueCode/components/VueAppContainer.vue
Usually, in a Vue application, you would pass the store as a property to the root Vue instance. Something like:
But here, in the context of Angular/ngVue this will not work. We have to use $ngVueProvider at the configuration phase of Angular module to inject the property.
Again, I will configure it in the ngVueComponentsModule, because there lives everything related to ngVue.
ngVueBridgeCode/ngVueComponentsModule.js
vue-router is now enabled, and you can access it on any child component: we have just fulfilled requirement #4.
What most people don’t understand is that UFOs are on a cosmic tourist route. That’s why they’re always seen in Arizona, Scotland, and New Mexico. Another thing to consider is that all three of those destinations are good places to play golf. So there’s possibly some connection between aliens and golf.
(Alice Cooper)
Sharing factories: consuming Angular services from Vue
Actually we still lack one piece: router links. To add them we will refactor our code a little bit. Even though we will soon replace it with something Vuex, refactoring routing give us the opportunity to rewrite the existing searchService.js, and transform it in something both Angular and Vue can consume (and this could be useful in many situations).
Let’s start by rewriting it in ES6 into the ngVueBridgeCode/services, to transform it into something “less Angular”.
ngVueBridgeCode/services/searchService.js
Our service is a plain javascript class. In the future we will simply import and use it as a ES module in Vue code. For now, we will share it on Angular and Vue instances thanx to Angular’s providers and the $injector service.
An angular service registers a service constructor, invoked with new, to create the service instance. It should be used (guess what) when we define the service as a class.$injector is an Angular service used to retrieve object instances as defined by a provider. $injector.get returns the instance of the service.
Exporting an instance of an Angular service allow then us to import and use it anywhere.
“My dear, here we must run as fast as we can, just to stay in place. And if you wish to go anywhere you must run twice as fast as that.”
(Alice in Wonderland)
Add this code to ngVueComponentsModule.js:
ngVueBridgeCode/ngVueComponentsModule.js
and we are done:
- we have rewritten the service as a class (previous code snippet)
- instantiated it as an Angular service (comment #1)
- exported the instance through
searchService(comment #2).
A note: to simplify a little bit, I deleted the ngVueDirectives.js file from ngVueBridge folder, and move the code there directly into ngVueComponentsModule (remove also the import inside vueApp/src/index.js e vueApp/src/DEV/dev.index.js). Refer to the codebase in tag-05-vue-globals.
Thanx to point 2 above you can safely delete angularApp/services/searchService.js (and the script tag inside index.html). You can leave the existing Angular code untouched, and everything will keep working (remember to npm run build).
Move on and migrate also “detail” and “searchResults” components. Here, we can barely mimic the existing code with little effort.
vueCode/components/SearchResults/index.vue
The HTML template is quite the same (the only difference being the use of a routing system). You can also simply copy and paste the css code from style.css.
And magic:
we are importing and using the searchService previously instantiated.
Basically vueCode/components/Detail/index.vue works exactly as SearchResults (refer to the repo).
Complete the refactor simplifying the container:
vueCode/components/VueAppContainer.vue
add the component to index.html, and rebuild:
code/index.html
We have just doubled (and almost completely migrated) our dear old Angular code:
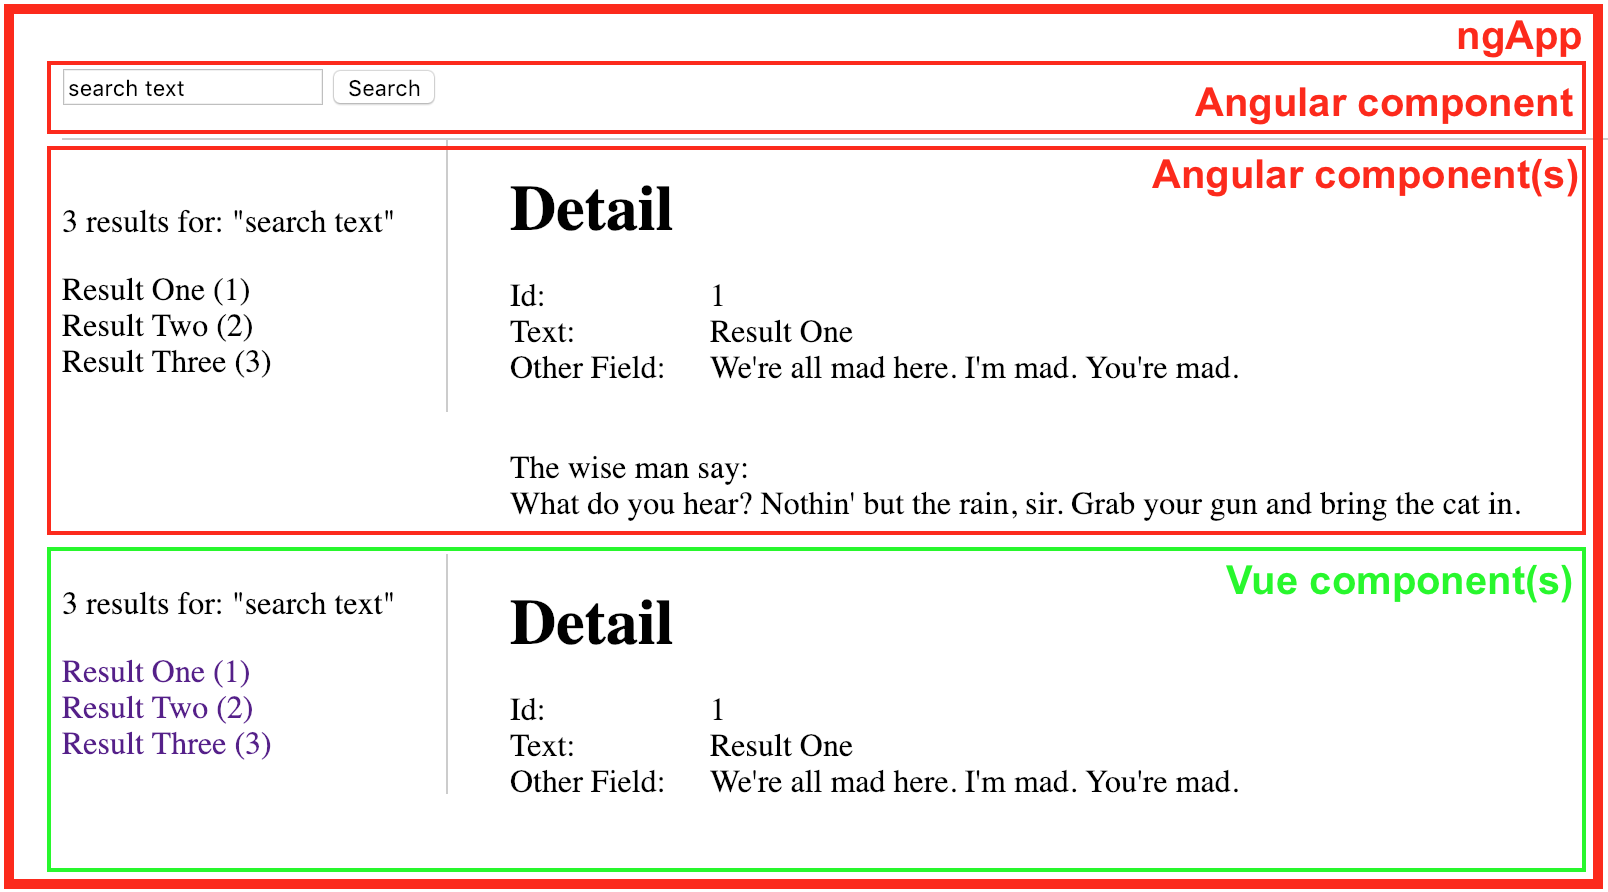
Starting a search (Angular component) will now activate Vue components. You can safely delete all the related dead Angular code.
Cool! We have just migrated to Vue a huge part of our application.
For details, refer to tag-05-vue-globals.
A centralized store: Vuex
In some way, we are using the searchService as a sort of centralized store to manage all our search and routing needs. We can do better, replacing part of or completely remove it, and introduce Vuex as a more advanced, performant, and predictable state manager.
Let’s start by adding a basic store file.
vueCode/store.js
“A journey of a thousand miles must begin with the first step.”
(Lao Tzu)
One day we will let the store manage everything. Now we only need one single small step (for a man).
No, we are not sending our application to the Moon (even though sometimes we would like to). We want to move to the store only the code responsible for retrieving and store search results.
As for vue-router previously, we have to add the store to the global properties.
ngVueBridgeCode/ngVueComponentsModule.js
But, wait a minute: and now what? Angular service and Vuex are separated worlds, how can they communicate?
“What we’ve got here is failure to communicate.”
(The Captain, Cool Hand Luke)
Well, Vuex is simply a JavaScript object that stores data, isn’t it?
I admit I was stumbling on my way to nowhere for a while, desperately searching for a solution, until I ran into it thanx to the suggestion given by a couple of sentences in How to embed Vue.js & Vuex inside an AngularJS app… wait what?.
“In Angular, there are providers, which are by far the most confusing aspect of Angular. […] One of these providers is called a “service”, which can be used to create a single store to reference throughout the app. All it needs is a function that returns an object. With a single line of code, I can return Vuex as an Angular service.”
(Jonnie Hallman)
Really intriguing! The solution is criptically dug there (in clear). Read that, and read it again; lucubrate, my little brain; use the Rosetta Stone to decipher Angular’s documentation for providers.
The keys here are factory and service recipes.
JavaScript developers often use custom types to write object-oriented code.
Yes, it’s me.
The Factory recipe can create a service of any type, whether it be a primitive, object literal, function, or even an instance of a custom type.
For example:
Remember? From store.js we are exporting new Vuex.Store().
And then, all of a sudden: EUREKA! Add a single line of code.
ngVueBridgeCode/ngVueComponentsModule.js
Brilliant! We have just exposed our store instance as an Angular service. Thanx Jonnie.
To consume it, just inject it into the constructor of searchService.js, replace code in executeQuery, and use it exactly as you would in Vue:
ngVueBridgeCode/services/searchService.js
Could you see the potential? You can progressively migrate your services.
And you can use it also inside your dear plain old Angular components. For example, let’s say we would like to add a results counter in the header:
angularApp/components/search.js
Opinionated tip: If you inject the service renaming it $store you got something very Vue:
The resultsCount function to me is like simulating a Vue’s computed property (ok, just a ton heavier).
But, if you rebuild, launch the application, and start a search… WTF? No count!
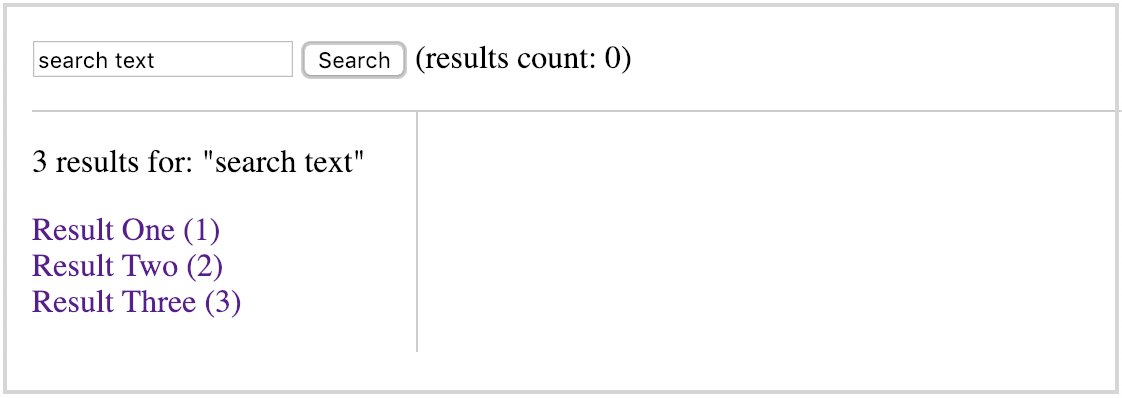
As you know, we are crashing here with the mysterious world of Angular’s digest loop. We are doing something secretly from Angular. We explicitly need to call Angular, and inform it something has changed to trigger the digest. Yes: $apply at rescue here.
“Isn’t it unsafe to travel at night? It’ll be a lot less safe to stay here… Is there anybody out there?”
(Pink Floyd)
ngVueBridgeCode/utilities/safeApply.js
I am wrapping the function in a “safe apply” to avoid possible “$apply already in progress” errors. But how to use it? One of many possible solutions follows.
If you rewrite your component as an ES6 class you can simply import and use it as a module. Here we are still dealing with a classic component, so I will write a service as a proxy to expose it:
ngVueBridgeCode/services/utilities.js
and
ngVueBridgeCode/ngVueComponentsModule.js
No need to export anything here, we will not use it inside Vue code.
A possible use of that is (also thanx to the fact we are using promises):
angularApp/components/search.js
In practical terms, we are manually invoking a rendering. We are introducing a maybe unnecessary $scope, but that’s a small price to pay. Now, if you start a search, you will get a working counter.
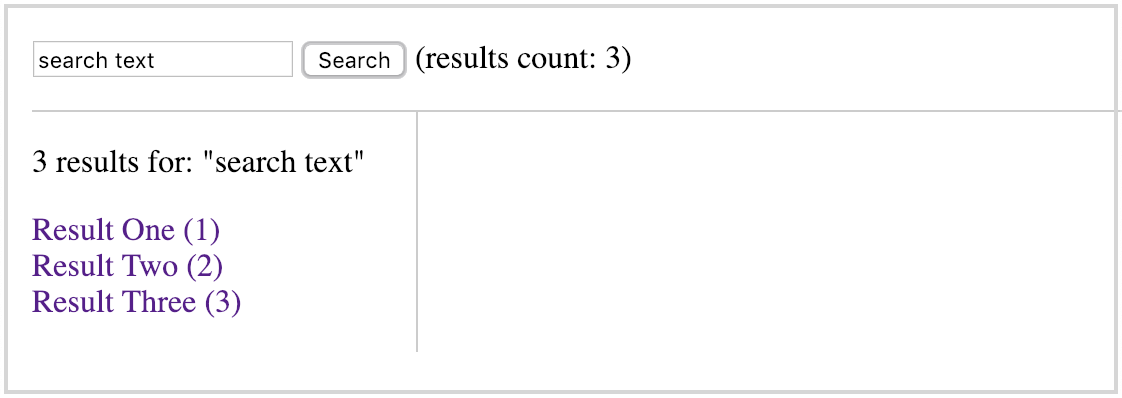
There are however situations in which you cannot use this approach, or maybe you want to achieve something more complex, or let Angular and Vue communicate passing data each other.
As a stupid example, think to a button inside the Vue component responsible to render a selected detail. Clicking the button you add a new item to the results set. I know, a really stupid example, but quite useful in demonstrating what I am going to expose.
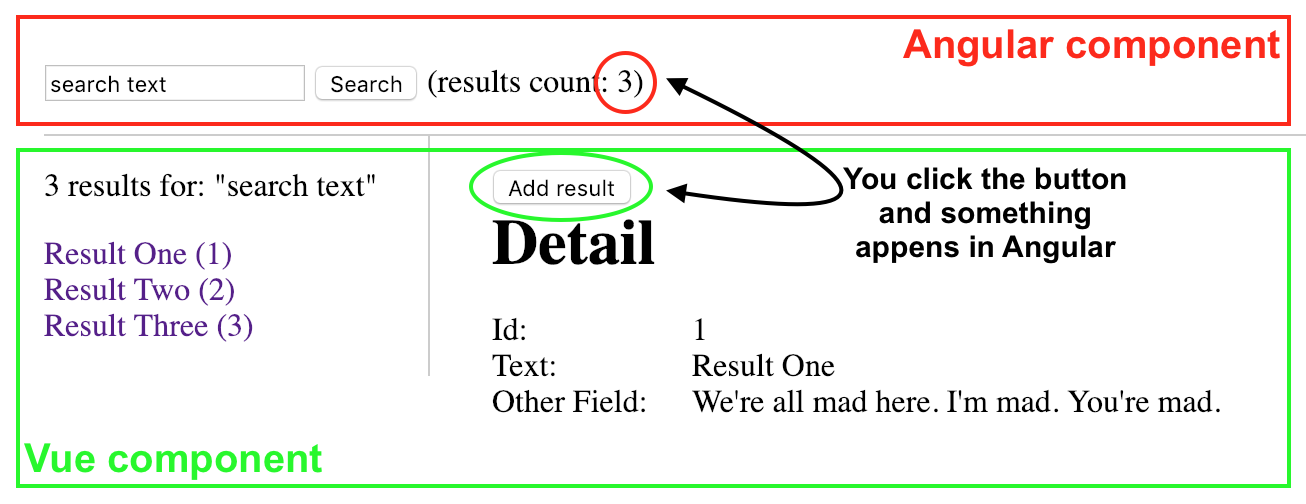
Let’s start by adding the button in the component template:
vueCode/components/Detail/index.vue
And the relative action in the store:
vueCode/store.js
If you test this code now you can easily see that, when you press the button, nothing happens. Actually nothing happens until you wake Angular up: try pressing the “Add result” button and then change the search string in the input, or press the “Search” button again.
No black magic here, you are just letting Angular digest the pizza.
There are many possible alternative solutions.
For example, while I was studying the problem I came to this smart jQuery solution: Progressively migrating from AngularJS to Vue.js at Unbabel. There the author suggests, if you are already including it, to use jQuery as a bridge, or, better, as an event bus, taking advantage of its .trigger() and .on() methods, to trigger custom events, and share information between Angular and Vue.
Sure, a possibility. But can we replicate that in a cleaner way, where clean means “Vue as much as possible”? After all it would be nice to remove another additional dependency.
Well, maybe we can, thanx to the possibility of creating a global event bus in Vue (refer to the official documentation about state management, or here and here).
ngVueBridgeCode/utilities/vueAngularEventBus.js
Simple as is.
As usual, to use it in Angular wrap the Vue instance returned above into a factory:
ngVueBridgeCode/ngVueComponentsModule.js
I am placing it into ngVueBridgeCode folder because it is just a temporary helper, and ideally it will be removed once the migration is complete. I will simply delete it and all references to VueAngularEventBus.
Using it is very simple. Remember: what we are going to do is to inform Angular to re-render because something has changed somewhere out there. Namely: when a Vue component updates the store simultaneously the store fires Angular to trigger a new $digest cycle.
Therefore, we need a reference to the bus in the store:
vueCode/store.js
On committing a mutation we will also emit an event through the bus. All the listeners subscribed will react consequently:
angularApp/components/search.js
Which we could represent graphically as:
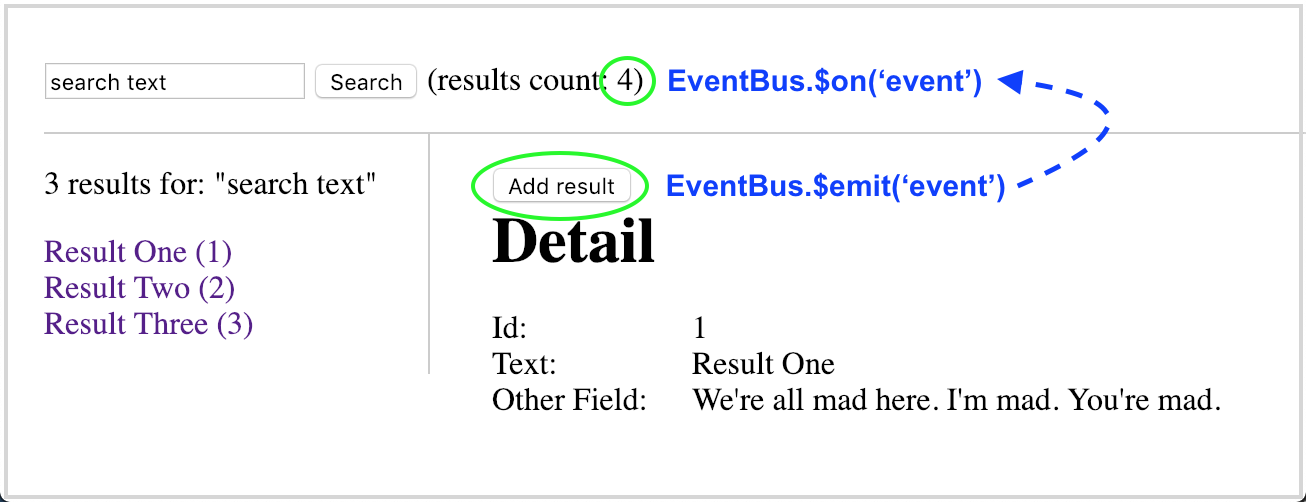
The component re-renders anytime the custom “result-added” event is triggered. As a consequence, the counter will be now updated every time you press the “Add result” button.
Remember to remove the listener once you destroy the component.
Completing that we have also shipped requirement #3.
Refer to tag-06-using-vuex for what we have done so far.
“See this? This is my boom stick! It’s a 12-gauge, double-barreled Remington. S-mart’s top of the line. You can find this in the sporting goods department. […] It’s got a walnut stock, cobalt blue steel and a hair trigger.”
(Ashley J. Williams, Army of Darkness)
Bonus #1: free Angular components from Angular
A further step in the migration could be rewriting existing Angular components as ES6 modules. You can move them into your webpack build, you can write them in a more concise style, you are maybe learning ES6+ and want to have fun… whatever. Or maybe you are not interested in any restyling (you already write Angular component that way or you prefer to directly migrate the component to Vue). Either is fine.
Just in case, you can move for example angularApp/components/search.js into vueApp/src/ngVueBridgeCode/components/Search/index.js, and rewrite it as:
ngVueBridgeCode/components/Search/index.js
Note: to use SafeApply we do not need the wrapping utilities service anymore.
Instantiate it as an Angular component:
ngVueBridgeCode/ngVueComponentsModule.js
And delete all files and code related to the original component. Our Angular app is reducing to its bare bones.
See tag-07-es6-components.
Bonus #2: free Vue components from Angular services
Now we have got a store we can move on and strip searchService of unnecessary parts.
For example, the store.currentDetail property and the selectItem(id) method are exclusively used by the detailVue component. Let’s move them from the Angular service to the Vuex store.
Comment (or delete) the following lines:
ngVueBridgeCode/services/searchService.js
And modify the store:
vueCode/store.js
Lastly, rewrite the component to use the store in place of the service:
vueCode/components/Detail/index.vue
Sure, you can probably do the same with the store.searchResults property. Our Angular app is reducing to its bare bones.
Refer to tag-08-more-store.
Conclusions
As you have seen, once you grasp a way (I am not claiming here mine is the best or the only one) to let Angular 1.x and Vue cohabit things get easier, and you can resort to a methodology for migrating your codebase progressively.
“I belong to the warrior in whom the old ways have joined the new.”
(The Last Samurai)
Again, what has been exposed in this article reflects only my opinions, and do not, in any way, constitute the best or only way to achieve the ultimate goal of renewing an old application by completely removing Angular code.
Oh, one more thing…
Angular components nested inside Vue components
Ok, you got me! What about requirement #2? What happened to inner-detail once you migrated to vue-app-container?
I have to be honest here, and admit we must be brave and really creative to solve the last puzzle.
“That’s my friend, Irishman. And the answer your question is yes – if you fight for me, you get to kill the Angular.”
(William Wallace, Braveheart)
As confirmed by one of the main repository contributors, ngVue was not designed to allow AngularJS components to be rendered inside Vue components. Someone has tried to solve the problem using slots, but, due to rendering differences between the frameworks, the implementation is buggy (and not recommended, because maybe in the future will be deprecated, as stated by issue #66).
After a brief discussion (see issue #79 on GitHub), thanx to tips coming from all the participants involved (and a previous experience with Angular injector), I overcame the problem the way I will tell below.
It seems to work, but it is somehow experimental indeed (I simply lack a deep knowledge on the subject, and I am not completely aware of possible unwanted side effects). Hence I am not sure I would really recommend it.
Anyway, to me nesting Angular components inside Vue was an essential requirement; so I report it here to complete the picture, and give a possible solution.
TL;DR: I cooked up a Vue component which wraps and compiles an Angular component, and quietly listen for changes in the scope bound.
ngVueBridgeCode/components/AngularComponent.vue
Which I could roughly visually summarize as:
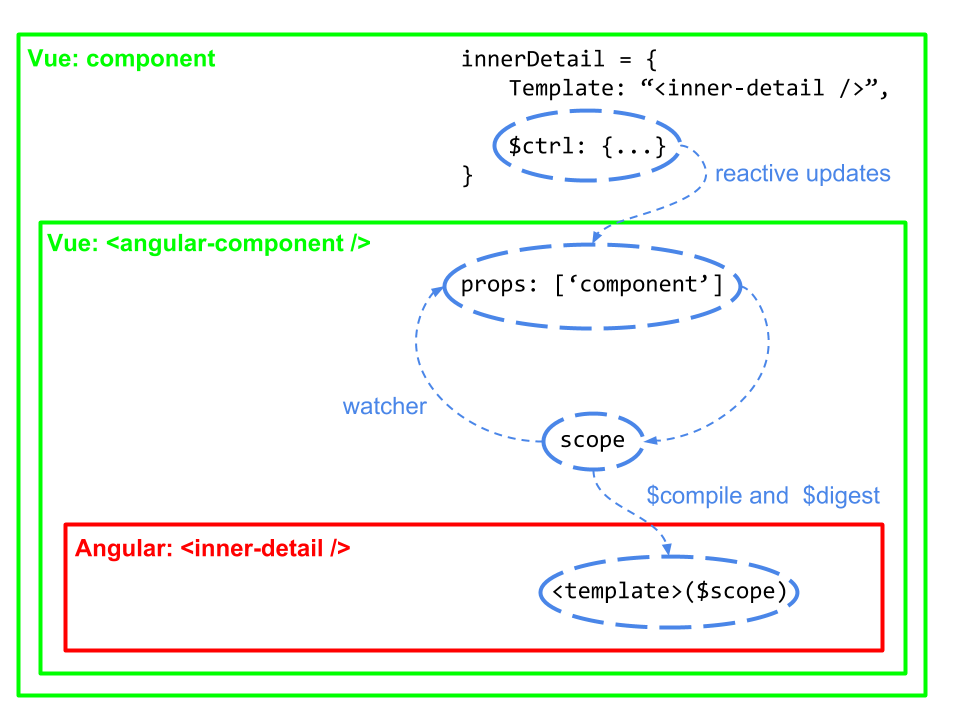
A lot of stuff in a few lines:
#1: injector is an Angular object that can be used for retrieving services as well as for dependency injection (see the official documentation). Here we are accessing to it to inject and compile a component on the fly, after the Angular application has already been bootstrapped.
#2: here we are setting the scope we will bind to the component template, extending a fresh $scope with the $ctrlobject passed by the component prop, which basically is an object like this:
#3: we replace the <div/> tag in the Vue template with the compiled Angular component.
#4: as already seen previously, we are entangled to Angular $digest loop. To inform Angular something has changed in the object associated to its current scope, update bindings, and re-render, we are introducing a watcher on the component.$ctrl prop. Note the { deep: true } option, to trigger the watcher in case you have got a complex nested object.
#5: any time the prop changes, we update the scope by merging the new object ctrl with the existing scope.$ctrl – angular.merge performs a deep copy, which is what we need here to be sure to propagate all the updates.
#6: and any time the prop changes, we call our old friend SafeApply (which works here as a sort of “render” function), bound to an updated scope, to start a $digest.
#7: this.$watch return a function we can use to clear the watcher when the component got destroyed.
Given what the official documentation for $apply says, it is maybe better to rewrite #5 e #6 as:
Then you simply use the component wherever you want to inject an Angular component:
vueCode/components/Detail/index.vue
innerDetail is the component prop we have previously introduced. It is better to define it as a computed property to get it correctly initialized.
Please note: I have found that in order to have the Angular component completely working, you nee to define its HTML template in a separate file:
I guess it depends on how and when things are getting parsed and compiled.
For instance, if you write:
things will not completely work, and you end up having on screen an unresolved template:
If you now rebuild and launch the application you can check the innerDetail component is working as expected:
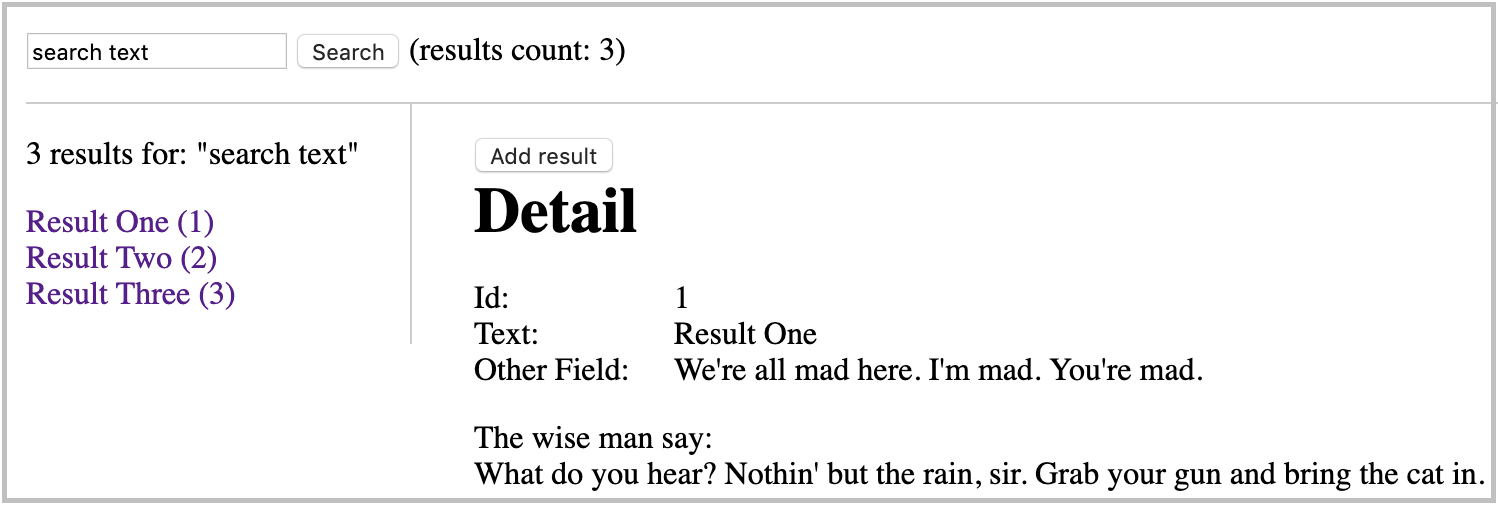
Refer to tag-09-angular-component-inside-vue.
K: I hope you don’t mind me taking the liberty. I was careful not to drag in any dirt.
(Blade Runner 2049)
Sapper Morton: I don’t mind the dirt. I do mind unannounced visits.

